30/04/2014

Discord Cosplay Part 6 - Pants

Yeah, part 6 of the Discord costume process. This is how I made the pants, it will probably not be a very long post. The only posts for this costume I have left is how I made the shoes and the extra accessories.

The pants were really easy to make all I used was:
- Pair of skinny jeans
- Short fur fabric
- Stanley knife
- Hot glue
- A friend :)
- A long television series of your choice (Mine was Grimm Season 1)

So grabbing my jeans I folded my jeans in half so that you see the backside of one whole leg and laid it flat over the fur (NOTE: I made sure that the fur direction was down my leg). I traced the out line and then re-folded my pants so that the front part of the leg was facing out and traced this onto the fur. I marked which was the front and the back. I cut out the pieces and went onto the next step.

I invited a friend over started watching Grimm. Then putting on the jeans I had my friend hot glue *VERY CAREFULLY* the sides of the fur pieces along the seams of the jeans. That's all it took to make the jeans but it took a long time because we were doing it carefully. This is probably not the safest method but it was effective in that the fur sits correctly on my leg without bunching up too much. Also while we where gluing we avoided the area where the belt loops where because I needed to be able to take on and off a belt.


AND there you have it the pants. Sorry it was such a short post but tomorrow's should be longer, It's all about how I made the shoes.

29/04/2014

Discord Cosplay Part 5 - Gloves

Hey guys! In this post I will be showing you how I made my gloves for my Discord costume. Discord has a lion arm and a eagle arm. I wanted to have a shagging, bulky arm for the lions arm, so I needed long fur which I bought from Lincraft. I wanted to buy fur from Spotlight but since I went in October there was no stock I would recommend buying fur from Spotlight at this time of year because they have plenty of high quality fur. I also bought my textured gold striped fabric from Lincraft. I was really happy with this fabric because it made the arm look way more visual appealing.

For the gloves I used:
- 1 meter of long fur for the right arm
- 1/2 a meter of striped fabric for the left arm
- Hot glue
- Pair of garden gloves
- 1 inch wide elastic
- Black food dye/ black fabric dye
- Fur shaver (optional)
- Needle and thread
- Paper and pencil
- Masking tape
- Glad-wrap

I think that was everything. The first thing I did was make the lion glove using following this video tutorial. Note that I made a glove and sleeves if you wanted you could make the glove attacked to the sleeve but I wanted to be able to take the glove off without taking of my shirt all of the time.
Hand Paw Tutorial Part 1
Hand Paw Tutorial Part 2

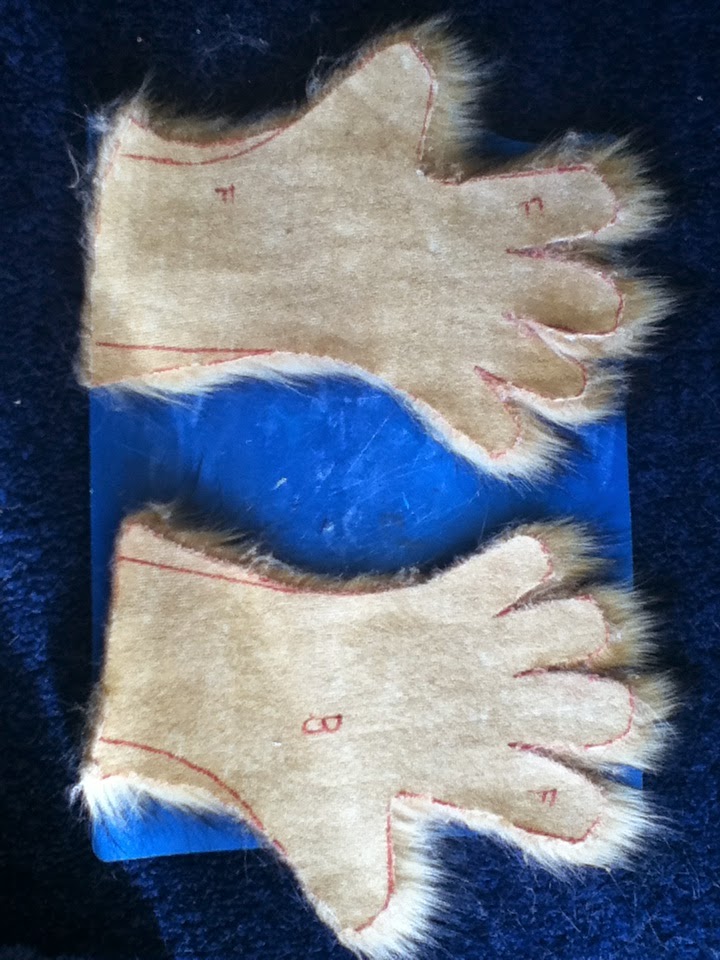
So starting out I traced my hand onto a piece of paper the re-drew the line making my hand about 2cm bigger. At my wrist I gave myself about 3-4cm on each side. I then cut out the paper and traced it onto my fur making cutting the shape out once then flipping it and cutting the shape again so I had the top and bottom of the glove. I then marked the inside with a Sharpe so that I new which side was which.


I then got my fur shaver and shaved the palm side of my fur down so it was much shorter.Which on the image above was the hand with the 'f' on it for front (the other was 'b' for back).

With the garden gloves I mixed some red, blue and yellow food colouring together in order to get black and painted the fingers and palm of the glove (the food colouring stayed because I was absorbed by the leathery fabric).


What was supposed to happen was that I was to glue the fur onto the glove but this didn't work out so I cut the dyed fingers and palm from the glove, cut holes in the underside (shaved side) of the fur pieces and hot glued them on. ^^' I know not the most genius method, but it worked.
Then with right sides together I sewed from one side of the wrist all the way over the fingers to the other wrist of the fabric with a blanket stitch. Then I turned it right side out and voila the lion paw glove.


To make the sleeves I started with the eagle arm. With a friend helping me I wrapped my arm in glad-wrap and the with a couple of layers of masking tape. This was to make a sleep pattern to the shape and length of my arm. I cut it off along the underside of my arm, because that was wear I wanted the seam to be. Then I traced it onto my striped fabric making sure the stripes went horizontal down the length of my arm and cut it out. I then blanket stitched the sides together, rolled hemmed the edges and that was one sleeve down.


Using the pattern form the left arm I placed it on my fur fabric. I wanted this arm to be very bulky so I traced the width about 2.5 inches bigger on each side. I cut this out and then blanket stitched the sides together. There was no need to hem the edges because the fabric didn't fray.


I also did my research and looked up how to make fursuit partial arm sleeves and gloves. I used this example for joining the sleeves together.

This tutorial was made by Chaoticdino, I think, on Deviant Art.

As you can see I attached the sleeves in the same way, I measured my shoulder width and then trimmed it shorter so that the elastic would hold up the sleeves and stretch as I moved.


That's how I made my Discord gloves and arm sleeves I hope this helped anyone who may want to make a Discord costume. My next post will be on the pants.

28/04/2014

Discord Cosplay Part 4 - Pants

This post is how I made my tail for my Discord costume. I couldn't find any good tutorials so I had to kind of improvise. I made a tutorial but it may be a little hard to read so I will explain how I made it anyway.

Here is the tutorial, I hope it helps


I'll try to explain it anyway in case the tutorial isn't clear.
For the tail I used:
- A fishing rod
- Wool for the inside
- Wool for the fluff
- Fabric
- Hot glue
- Needle and thread (matching fabric)
- Elastic 1 inch wide
- Side release belt buckle
- Pillow stuffing

I bought a $7 fishing rod from K-mart and took it a part keeping the top half. I took of all of the rings that hold the string accept the one and the tip (in order to keep some thickness at the end). I then french knitted with some orange wool so that it was the length of the fishing rod pole. For people who may not know how to french knit I'll link a tutorial here - French Knitting Tutorial I then slipped this onto the pole and secured the ends with hot glue, so that it would not fall off. I made the tuff on the end of the tail by brushing out wool and straightening it was a hot straightener. I'll link the tutorial I used on how to make these. I learned it from a Yarn tail tutorial - Yarn Tail Part 1Yarn Tail Part 2 I then sewed all the fluffs onto the french knitted sleeve until I was happy with how fluffy and high it was. By now I had something that looked a little like step 4.

Next I cut fabric in a triangle the length of what was left of my fishing rod making sure to cut on the fold so that it would open as one large piece.


These are pictures taken from a Tail Tutorial made by CanineHybrid

I then hand sewed the two edges together using a blanket stitch. I don't have any photos but it is easy to just look up on Google and there will be clear tutorials. I used this stitch because it is easy and very sturdy and I cut my fabric without leaving any room for seam allowance, it just made it look neater.


This picture shows how I neatened off the end by tucking in the raw edges and doing a normal stitch just to finish it off.

I then hot glued the fabric onto the fishing rod, starting with the fabric inside out and gluing it wrong sides together (pulling it right side out as I went). I made sure that I was gluing the opposite site to the stitching, this made the fabric look like it had a spine/bone underneath. Make sure to glue quite a bit around the end where the fluff is so that it is closed completely.


Then I stuffed it with toy stuffing and sewed up the top. I measured the elastic a little shorter than my waist to compensate for the buckle and so that it didn't sag, hot glued the elastic to the flat top of my fabric (and I hand sewed it for extra security). The final touch was hand sewing the buckle on and it was done!

My next post will be on how I made the gloves.

27/04/2014

Discord Costume Part 3 - Horns and Wig

This post is about how I made my Discord horns and the wig I picked for the cotume. Discord has two different horns, an antler and a crazy twisted blue horn. His hair was strange it was white on his head but on his neck is a black horse mane. I decided I wanted my wig to be all black, this is because I wanted my dicord to look young.

What I used for this part was:
- Short hair wig
- Ponytail clip
- Air drying clay
- Chopstick
- Small paint brushes
- White acrylic paint
- Light blue acrylic paint
- Medium blue acrylic paint

I chose a wig for Arda Wigs called Jeanie in a Natural Black. This is because they had the colour I wanted as well as a wig with a detachacle pony tail.
Arda Wigs - Jeannie
There was a problem once I recieved the wig. My head was a little too small for the wig I even followed Arda Wigs tutorial on how to re-style pony tail wigs but it just didn't look right. In the end I bout a short wig from Arda Wigs called Jaguar (Jaguar) in the same colour as before and kept the pony tail from the previous wig. This sat a lot better on my head and looked really cool styled. If anyone wanted to do the same as me you can also buy the pony tails separate here - Long Ponytail Clip

I had never made horns before so I needed to look up how other people were making them and how they attached them to the wig.
This is the video I watched on how to make the horns - Cosplay 101 - How to Create Horns
Using the tutorial I decided that I was going to make my horns out of air drying clay and paint them with cheap dollar store acrylic paint. I would not recommend making large horns out of air drying clay. My horns where a very nice weight but any bigger and they would be too heavy and break.

Sculpting

These are the horns I sculped out of air drying clay that I bought from the Riot craft store. They are both approximately 15cm long. While sculpting I had to keep in mind how the horns would sit on my head. The horn on the left of the pictue would go on the right side on my head and the opposite for the horn on the right. The antle needed to sit practically straight on my head so I need to make the base flat. I made this horn by first making a straight pointed spike and then adding two branches of to the right, making sure to blend the clay together thouroughly.
The right horn was very tall and slightly thicker than the other. I wanted this horn to sit angled toward the back of my head so I needed to slant the base for it to sit properly.I then used a chopstick, copying the horn tutorial videa, and created a ridge from the base to the top.

Painting

I painted the antler with a cream coloured acryic paint and the other with a light blue. I had to make the out of a medium blue paint and white (approximately 2/3rds white and 1/3rd blue). I used this blue for the base colour and shadowed the ridge of the horn with the medium blue. The picute above shows me painting the horn blue and sanding the rough edges from the antler. I had sanded both to get rid of any roughness before painting.

This picture shows me painting the blue horn. For each horn I painted one side, let it dry, and then painted the other side. In the photo above the colour blue I used was too dark so I had to lighten it.

These are the finished horns. I left the base of each horn paintless because this would be rubbing againsted the wig and I did not want it to rub of on the wig. To completly finish them I put a layer of mod podge blue to prevent the paint from chipping and protect them from the weather.
Attaching

I did my research on how people attched horns to wigs and a lot where permanent but I did not want this. Some people used wood or sew on snaps but I tried something else that I think worked really well.

To attached the horns to the wig I used:
- 2x 15mm screws
- 4x screw washers
- 2x 3cm plastic wall plugs (cut down to fit inside the horn)
- 2x larger circles of plastic (circumference of the horn base)
- 2x sligtly smaller circles of plastic
- 2 part epoxy quick drying glue

I drilled a hole into each horn to fit the wall plugs making sure they where at the correct angle so that the horns would sit the way I wanted them to on my head.

The set up was like this for each horn:
- wall plugs inside horns
- 1x washer
- large plastic circles
- the wig net
- smaller plastic circle
- 1x washer
- screw going through all the pieces and wig net into the plug and tightened until sturdy


I tested how it would look and sit before I screwed and glued the plugs into the horns


This is what the underside looked like all together.


And finished! This is what the wig looked like at the end. I am really happy with how it sits and the weight of it.


Tomorrow's blog will be on the tail and how I made that.

26/04/2014

Discord Costume Part 2 - Jacket

This is the first part of the Discord costume I completed. I don't have stages of the process but I will tell you about the pattern and what I did. Since I didn't have a sewing machine at the time I went over to a friends house and used hers.

For this jacket the materials I used were
- Heavy weight fusible interfacing
- Chocolate $2.00 per meter cotton polyester fabric
- Black lining
- Two large sew on snaps
- Burda Style pattern 7211 Vest and Jacket
- Thread that matches the cotton fabric


This is the pattern and I used the over coat with the sleeves. Since Discord has two different arms, a lion and an eagle, we altered the pattern so that we only had one sleeve on the left. This sleeve was also shortened so that it could be folded up once at the elbow, this made the arm look like the leg feathers of an eagle. Because we altered the pattern we needed to add extra fabric to the shoulder of the right so that the front and back pieces were connected. For Discord we also altered the pattern so there was only lining on the inside of the jacket and not the sleeves. This thickened the jacket and gave it more shape but left the sleeves free for the arm fabrics.

Once the jacket was finished I hot blued two snaps to the middle section at the front. I used snaps instead of buttons because they would be easier for me to undo when in my costume. If I had buttons I would struggle to grab it with my gloves whereas I can just pull the snaps apart with gloves on. 

This is the front of the completed jacket and sorry the pictures are a little grainy, it is because I was using my ipod touch. You can see I let the lining show to create more colour and a wider collar. I'f you where going make this costume you could use brown lining but black was all I had at the time. I like the look of the smaller jacket that stops at my waist because it made me look slimmer and a bit shapely. I don't have any curves so this helps a lot and looks great in pictures.

This is the back on the top of the right shoulder you can see where I added the extra piece of fabric to join the back and front shoulders together. The right arm is the lion arm and I wanted it to look a lot more bulky then the left so I left quite a bit of space. Leaving the sleeve on the left made it look slimmer.

If you hadn't guessed yet from my concept sketches my costume is going to be feminine. I know that Discord is male but I thought this would make an excellent cosplay. No one else has done a female Discord so I thought it would be unique.

My next post will be on the horns and how I made them and got them to sit properly on my head.

25/04/2014

Discord Costume Part 1 Design - My Little Pony

Hello this is my first official blog post! On this post I will show you my concept designs for my Discord from My Little Pony costume. I made this costume over August-October of 2013 and I was inspired to make this costume because of the many different elements and components. Most of this costume was made with out machine sewing accept the jacket (my friend helped me with her machine), this is because at the time I didn't have a sewing machine.

Onto the designing. I love this character from MLP because he is crazy and fun. So in order to design him I collected screenshots from the show and both canon and non-canon images from the internet. I also looked at other people's costumes of Discord. Using these I drew a picture of what I thought Discord would look like if he was a human.

This was my first sketch and as you can probably see it is a bit all over the place and not very good. I just wanted to get my idea down so that I could finalize it.


Here is my second design where I put everything together to see what it would look like. The character Discord was full of elements he has a lion arm and an eagle arm, a lizard leg and a horse leg, a dragon tail, two different horns and two different wings. I decided that I would not have wings on my discord character because there where already so many elements to him. I planed to make the arm like those of a partial fursuit. such as how the sleeves are attached at the back with elastic and the lion paw was a glove. I would need two different pants that I could sew together to get the two colours and I would need to make the tail and horns.

The next step in the process of making Discord now that I had the design was buying fabrics for him. I ended up going to two fabric stores, Lincraft and Spotlight.

These are swatches of the fabrics I bought for Discord. The top left is a cheap polyester cotton(lincraft), top right, I can't remember the actual name, but it is a crushed two toned gold and pink woven fabric(lincraft). Middle left is a caramel short cheap fake fur from spotlight, middle right is an expensive long, light brown to black fake fur from lincraft. Bottom left is a mixed woven fabric with textured stripes of gold velvet and gold heavy cotton like fabric(lincraft). Bottom right is a light brown minky from lincraft, I didn't end up using this fabric like I intended to.

I hope you found my first post interesting. My next post will be of the process of making the jacket.

24/04/2014

Welcome to my blog

Hello I'm Shiver and on this blog I want to share the processes of making my costumes! I plan to upload at least one post a day for the next two weeks and from then on I will upload whenever I make a new costume. On this blog I will be posting my costumes as well as any sewing projects that I happen to do.

Stay tuned tomorrow for my Discord from My Little Pony costume. My first post will be of the design process and fabrics I used.

Please excuse any delays as I am new to blogger and just working out the details. I hope you can enjoy the process cosplaying as much as I do.